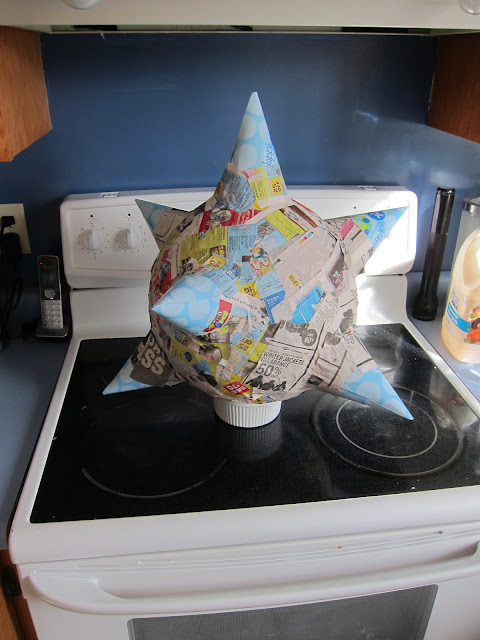
I wanted a perfectly round ball, so I bought a punching balloon from the dollar store. It blows up pretty big, so I ended up with quite a large pinata. The make the points of the star I cheated a little and used birthday hats (If you want a longer point then you can roll of newspaper into a cone shape).
After adding several layers of papier-mâché to my balloon, and letting it dry completely, I added my hats.
I started with one on top, and then about a third of the way down the balloon (longitude) I added three more (just imagine a triangle shape when you are looking directly down on the pinata/bird's eye view). Then at about two-thirds of the way down I added three more hats with my "triangle" shape rotated slightly from the one above so they pointed out evenly in different spots on the pinata. (Sorry if this sounds very confusing!) To attach the hates you can either use hot-glue, or more strips of papier-mâché (that's what I did). There is no hat at the very bottom of the pinata, because it will actually get flipped up-side down and have a hole for the candy there.
After the hats were in place and dry, I popped the balloon inside, and made the opening a little bigger, and then attached string.
Next for decorating I decided to use a variety of colors. I have 7 cones, and wanted each to be a different color.
I started by decorating all the cones. I cut 4-5 inch lengths of streamers, with snips cut into them to make a fringe. Then, started at the tip I used more papier-mâché paste to attach them, wrapping them around the cone. overlapping slightly and working my way down to the base of each cone.
For the body I cut lots of little squares from each color and then stuck them on with the paste in little clusters of color.
A view from the bottom of the pinata.
I also added some skinny strips of streamers at the point of each cone. It's really pretty when the pinata swings on it's rope with the fluttering steamers! (sorry this isn't a great photo, I forgot to take one before the party started).


